
Introduction to setting up a battlefield for On to Glory :
When first setting out on this rule-writing adventure my original brief was to create something that I could re-fight the Waterloo campaign with (at battalion level). After penning the basic premise of the rules I launched into some tentative play testing based around the battle of Quatre Bras. However, it soon dawned on me that by the time I had a set of rules I (hopefully) liked. I would be sick to death of the battles I wrote them for. Thus, I have departed from repeatedly fighting Quatre Bras and moved more toward a pickup game format.

This article takes a quick look at what I came up with for generating a random battlefield. I won’t cover the rules in too much depth here, as I just want to demonstrate what a table might look like using this system.
The size of things: The following set-up was designed around a standard four by six foot or 1200/1800mm table. Each side of the table is subdivided into three square sections measuring two foot by two foot (600/600mm) as pictured on the right. In game terms, these square sections are 15MU by 15MU (movement units) in size. One MU is equivalent to 40mm. For larger games extra sections can simply be added to extend the table’s length.
- Attacker/Defender roll: This is pretty standard stuff. Each player rolls 1D6 with the highest score denoting the attacker. In this 1815 example, the French player gains a 3+ modifier to his dice roll. This is because the French were much more aggressive than the British in the Hundred Days campaign. Rolling their respective dice the British player scored a 4, while the French player rolled a 5 (+3=8). Eight to four, the French will be attacking in this game.
- On good ground: Next the (defending) British player rolls 1D6 and consults the topography table. The resulting score will determine if he has elected to stand and face his opponent in an area that has open or closed flanks. Unsecured or open flank sectors do not roll on the contour tables. They cannot contain any features other than cultivated land and are therefore vulnerable to enemy flank marches. In this example, the British player rolls a four (both flanks are secure). It should be noted that a bad roll on the contour table can also leave a player with an open flank. However, this can be remedied later by placing a BUA (built-up area), woodland area or stream on that flank.

Topography score: 0) both flanks are unsecured: 1) Left flank open: 2) Right flank open: 3-6) Secured flanks: Spanish generals -1 to their dice roll.

- Contour rolls: 1D6 is now rolled for each of the table sectors that aren’t considered to be an open flank. Both players roll for their sides respectively and consult either the defender’s or attacker’s contour table. The same three basic results appear in varying degrees on both tables.
- Open ground: Representing a relatively flat open plain
- Ridge Line: A connected line of three small rises spanning the width of the sector.
- Large hill: A single large area of ground that gently rises above plain or valley floor.


For the sake of time and space, I will only cover the defender’s dice rolls in any detail.

- Large Hill placement: 1D6 is rolled for each large hill with the following possible results.
- 1) An edge of the hill must touch the left-hand side of the sector while remaining at least 2MU from any other sector edge.
- 2) An edge of the hill must touch the player’s baseline (within the sector) while remaining at least 2MU from any other sector edge.
- 3) An edge of the hill must touch the right-hand side of the sector while remaining at least 2MU from any other sector edge.
- 4) Some parts of the hill must touch both the baseline and the left-hand side of the sector while remaining at least 2MU from any other sector edge.
- 5) Some parts of the hill must touch both the baseline and the right-hand side of the sector while remaining at least 2MU from any other sector edge.
- 6) The hill must be placed somewhere in the middle of the sector at least 2MU from all edges.

Ridgeline placement: The shape and location of a ridgeline is defined by three dice rolls. The first roll denotes where the centre hill section will sit. In the case of the defender, 1-2-3 is 12MU from the player’s baseline, while 4-5-6 is only 10MU from the baseline.

The remaining two dice rolls depict points on the left and right-hand edges of the sector. Small hills are then placed to connect the defined edge points to the central hill. In our example (left) you can see the shape of the defender’s ridgeline generated by the following dice rolls, 6-3-4.
After all ridgelines have been placed (defender’s and attacker’s) 1D6 is rolled for each small hill that is between two hills or is touching a table edge. If a six is rolled the face of that part of the ridgeline is marked as rough ground.
In our example, the left-hand hill rolled a 6 and is therefore marked as rough ground. The centre rolled a 4 and is fine. the right-hand side does not roll as it is not touching a table edge or between two other hills.
- Attacker’s contour rolls: Although an attacking player only has a 50% chance of generating any hills on his side of the table. In this example, the French player has managed to roll high for all three sectors. The resulting ridgeline locations were defined by rolling dice as denoted above. However, an attacker’s ridgeline is always placed 2MU closer to his baseline compared to the defender’s setout distances. Thus a roll of 1-2-3 is 10MU not 12MU from the baseline and 4-5-6 is only 8MU from the baseline.

Flank terrain roll: Once all of the hills are in place the defender must choose one short table edge and roll on the table below. 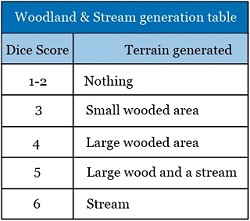 Continuing our example the British already has some rough terrain securing his left. So he elects to roll for his right flank. Rolling a 3 generates a small wooded area. This must be placed in contact with the right-hand table edge no more than 20MU from the defender’s base-line.

- BUA placement: In “On to Glory” built-up areas (BUA) are represented on the tabletop by small groups of 6mm buildings arranged on a 100mm square base. These bases can be connected together to depict towns (3+ sections), villages (2 sections) or farms (1 section).
Continuing with our setup the British player rolls 1D6 to determine the number of BUA points (between 5-7) that will be available for this game. He must now divide these points up into towns, villages or farms. Each section is worth 1 point unless it is a closed section (walled or fortified) in which case it costs double.

In this setup the British player generated five BUA points and elected to spend two points on a village (compulsory), one point on a farm and the two remaining points on a walled farm. Starting with the defender each player takes turns in placing one of the three built-up areas on their side of the table.
Built-up areas were the focal point of some bitter fighting in a large number of Napoleonic battles (IMO). Therefore, their placement on the tabletop can affect the outcome of an OtG game in a significant way. Victory conditions are very simple in these rules. The attacker wins by breaking his opponent’s army, while the defender wins by holding on to the end of the day (game). A standard game is just nine turns long. However, where the defender places his buildings and who occupies them during the game will either add or remove turns from the game’s time-clock.
If a BUA is placed within 10MU of the defender’s baseline, the equivalent number of BUA points will be added to the game’s time-clock. BUA sectors in the defender’s half of the table that are captured by the attacker will also add turns to the game in the same manner. Buildings in the attacker’s half that are captured or recaptured sectors in the defender’s half will subtract turns from the game’s time-clock.
In this example, the British player has elected to place the buildings over 10MU from his baseline in order to avoid adding extra turns to the time-clock. Of course, these buildings are now perilously close to the attacker’s deployment zone. As such a strong garrison is recommended.

- Road and cultivated land rolls and placement: The final step in the process is to add roads and cultivated land to the tabletop. While there are rules that govern the placement for both of these terrain types. I will focus on the cultivated land here as roads have little impact at this scale. Each player rolls 1D6 and consults the table pictured below for each farm, village or town on their side of the table. The resulting dice rolls and the fields they generated are depicted on the map to the right. Note, roads cannot cross or pass through cultivated land or farms. However, they may pass through towns, villages and woods. Below is a photo of the battlefield setup and ready for troop deployments.


Final thoughts: Most of the rule systems I am currently familiar with, either don’t include a section for terrain placement or have a two-part system. In a two-part system, both players choose objectives from whatever terrain has been randomly generated and placed about the table. This has never really felt right to me. Odd disconnects would sometimes happen, like having to place a random field in the middle of nowhere or a small forest becoming an important objective. As stated earlier in this article the objective in OtG is for the attacker to break the defender’s army. The strategic placement of BUAs (in OtG) can help secure the defender’s position and hopefully prevent the collapse of his army. However, if these strong points should fall to the enemy the attacker will gain precious time with which to accomplish his goal. I should point out this is only version 1 of my setup rules so the tables presented here will most likely change over time. As always please feel free to send me any thoughts or feed back.
