
Introduction
This small, but tough Roman army follows the parameters detailed on the Basic Impetus page of Dadi & Pombo’s web site. At present, I have completed two medium cavalry, four heavy foot and two skirmish elements, which is the standard force for these rules. Units stats, special weapons and other list options can be viewed for free on the Basic Impetus web page under the army list sub section entitled Rome and the Mediterranean.
Based to match my Carthaginian and Numidian armies on 3mm thick laser cut plywood all units share a common frontage of 120mm. Only the base depth varies depending on the unit type, 80mm for cavalry, 60mm for infantry and 40mm for skirmishers.
Figure wise I chose to build the entire army from Aventine miniatures excellent Republic Roman range. The little big man shield transfers and steel javelins were also procured from Aventine miniatures at the same time.

Medium Cavalry & General
Combinations of the following cavalry packs were used to create these two mounted units 1x RR40a (Mounted officers), 1x RR41 (Mounted command) and 2x RR42 (mounted swordsmen) . The foremost element represents the army commander and contains two officers, two standard bearers, a musician and single swordsman. The second cavalry element contains one officer accompanied by four swordsmen.


Heavy Infantry Legionaries
Making up the bulk of this Roman army these four elements of legionaries each contain a Centurion, Signifier, Vexillum, Cornicen and eleven swordsmen. The red and white shield transfers are intended to help identify different army groups once I have completed enough units for multiple command size games.


Separate sword arms
All the infantry packs I purchased came with detached sword arms (pictured left). This allowed me to create variations of the four standard poses supplied within each pack. By cleverly covering the join between the torso and the upper arm with the chain-mail shoulder strap, there is no unsightly cracks to fill. This basically means once the glue dries you are ready to undercoat. Pictured below are a few examples of how the arm can be attached in a variety of positions.


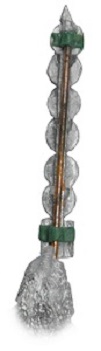 In order to help my armies survive the riggers of the gaming table I tend to replace any pre-cast banner poles with metal or brass rods.
Left Once the pre-cast pole has been removed and something stronger glued in place, tags made from Green Stuff are added to help cover the join at the top of the pole.
Right After a lick of paint you can’t really tell it has been changed.


Vetiles
These two skirmish elements are a mixture of the Aventine packs RR001 (wolf fur covers on the helmets) and RR002 (standard helmets). Although each pack contains four pre-cast javelins I ended up replacing those with the much tougher steel variety. For added effect I have drilled out the hands on each shield arm so a second javelin could be added to each figure.


Originally designed as a small Basic/Standard Impetus force this army contained a very limited amount of elements, but with the arrival of Basic impetus 2 I have revisited the army and slowly started adding more units. The plan at this stage is to end up with enough bases to field two full Basic Impetus 2 armies. These two armies will be represented on the table as white (shield) and red (shield) legions. Pictured below is a look at the extra elements I have managed to complete thus far.

First up are two elements of Principes pictured below with two new bases of Velites. Viewed from behind these troops are depicted holding pilums in order to help differentiate them from my older sword armed Hastati units

∇ Principes command close ups ∇


Simple Colour Guide
Although my painting skills are pretty average I have listed (for those who maybe interested) the various colours and paint brands I used when working on this army. My colour choices were based mostly on what I had to hand at the time.
- Steel- Gunmetal grey**/Pig iron***/ Cold steel***/ Quick silver***/ Nuln oil wash****
- Wood- Wood stain brown*/ Shield brown*/ Driftwood brown*
- Bronze- German field grey**/ Old bronze**/ Brass**/ (watery mix) bright light blue and green
- Skin- Wood stain brown*/ Tanned shadow*/ Tanned skin*/ Tanned highlight*
- Tunic- Mahogany brown*/ Flat red**/ Phoenix red*/ Fire orange*/ Red clear*
- Leather- Wood stain brown*/ Flat earth**/ Beige brown**/ Leather brown*/ Seraphim wash****
*Reaper paints **Vallejo paints *** P3 paints **** Citadel wash
My take on Bronze
Pictured to the right is a good example of the aged bronze look I was aiming for when painting this army. Although probably not every ones cup of tea I like this greenish bronze shade and how it looks against the red shields and tunics. The greenish tinge was achieved by washing the bronze areas with a very watered down bright light green/ light blue paint mixture. This was a custom colour I made sometime time ago and now keep in a spare paint pot so I don’t have to repeat the exercise every time I add to the army.

Triarii
A final stand of Triarii equipped with long spears completes the first Legion which also contains one cavalry element, two Velites, two Hastati and two Principes. Like all the other figures pictured on this page these Triarii are from Aventine miniatures excellent Republic Roman range.

December 2017 Update:
The following photos show the latest additions to this army. I have now completed enough elements to represent two full legions. For ease of command I have colour coded the two legions with red and white shields. When combine with supporting Gallic war-bands and Balearic slingers these additional troops allow me to field two full Basic Impetus (2) armies. Pictured to the right is my take on some Pilum markers these are placed next to Principes and Hastati stands until unleashed in the first round of combat. The Balearic slingers pictured below will also server in my Carthaginian army from time to time.


▼The full Roman army with Gallic war-bands and Balearic slingers in support▼
